Shiny is a way to deploy your data analyses in an interactive format that is backed by R.
In an earlier post we went over how to get a basic Shiny app together and deployed to shinyapps.io. Now we will look more at reactivity and customise appearance using tech like html5 and css from within RStudio. Specifically, we put a bit more focus onto the server side.
Table of Contents
Customising Reactions
So earlier we saw that we can update various outputs based on a users input. However, we can also use reactivity to trigger code on the server side or output after some chain of reactive updates or, we could postpone updates until a user explicity requests them through an update button. In short, reactivity is what makes your Shiny apps responsive. This article explains reactivity from the ground up.
The first thing to understand about reactive elements is that they work together with reactive functions. Loosely, a reactive element is just something that can change dynamically such as a slider on the user interface, that might be referenced in the server side with something like input$myslider. However, you cannot just access input$myslider willy-nilly, it needs to be enclosed in a reactive function. For example, the renderPlot function is a reactive function that expects to receive reactive variables such as input$num discussed last time. The input reactive values notify the observer whenever there is a state change and the observer function responds which will lead to re-rendering the plot (or whatever). More information on reactivity can be found at the shiny site.
There are about 7 functions you need to know to work with reactivity a large proportion being the render*() functions, but there are a few others we discuss here.
reactive
You can (and should) modularise code by using the function named reactive. With this you can, for example, share the same data across multiple reactive functions. However, in order to access the data stored within reactive you need to invoke the data name as if you were calling a function. Below is an example to make it clear. We define a reactive data set and assign it to x. Whenever the input gets updated by the user the reactive method updates x. Now, within the render functions what we need to do is call x like we would call a function.
Note that reactive caches its value until it becomes invalid due to user input.
library(shiny)

ui <- fluidPage(

  sliderInput(inputId = "num",
              label = "Choose a number please",
              value = 25, min = 1, max = 100),
  textInput(inputId = "title",
            "Provide title",
            value = "Histogram of normal RV"),
  plotOutput("hist"),
  verbatimTextOutput("stats")

)
server <- function(input, output){

  # New reactive part !!!
  x <- reactive({rnorm(input$num)})

  output$hist <- renderPlot({
    mymain <- input$title
    # Call x as you would a function !!!
    hist(x(), main = mymain)
  })

  output$stats <- renderPrint({
    summary(x())
  })
}
shinyApp(ui = ui, server = server)
isolate
The isolate function is the opposite of the reactive function. This function makes user specified input inert. For example we could make the graph title not update until we change the slider by wrapping the title in an isolate call as follows:
# Note that here we wrap the title and make it inert
# until a user updates the slider.
output$hist <- renderPlot({
    mymain <- isolate(input$title)
    hist(x(), main = mymain)
  })
Server-side Triggers
Maybe we want to save a file to the system or do something that does not result in a UI update. In order to do this we implement a basic UI with a button for the user to click that we use to trigger the observeEvent function. This function can wrap a whole bunch of R code (using reactive elements if we want it to do so) but it is only run if the button is pressed, i.e. it is inert to all other updates. However, if the user clicks the button then code encapsulated in observeEvent will use all the latest reactive values. Here is an example that prints the number of clicks.
library(shiny)

ui <- fluidPage(
  actionButton(inputId = "clicks",
               label = "Click me")
)
server <- function(input, output){
  observeEvent(input$clicks, {
    print(as.numeric(input$clicks))
  })
}
shinyApp(ui = ui, server = server)
For more information, see the action buttons article on the shiny site.
There is a second server-side trigger called observe but in practice observeEvent is more useable.
Delay Reactions with eventReactive
This enables us to do things like wait until a user has finished entering the title before we do an update. Here we add a button that will allow the user to control when the output updates.
library(shiny)

ui <- fluidPage(
  sliderInput(inputId = "num",
              label = "Choose a number please",
              value = 25, min = 1, max = 100),
  textInput(inputId = "title",
            "Provide title",
            value = "Histogram of normal RV"),
  actionButton(inputId = "go",
               label = "Update"),
  plotOutput("hist")

)
server <- function(input, output){
  x <- eventReactive(input$go, {rnorm(input$num)})

  output$hist <- renderPlot({
    mymain <- isolate(input$title)
    hist(x(), main = mymain)
  })

  output$stats <- renderPrint({
    summary(x())
  })
}
shinyApp(ui = ui, server = server)
Manage State with reactiveValues
As a rule shiny does not permit you to update input values. However, sometimes this might be useful to do and so shiny provides a mechanism to construct your own reactive values. You might use this in a situation where you want to trigger a data update conditionally, like this:
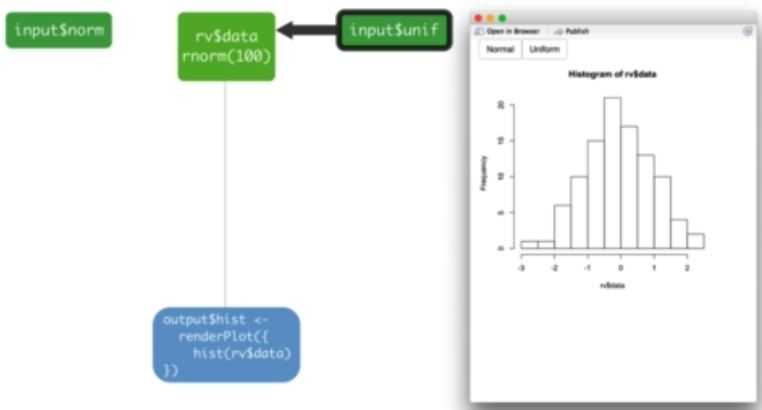
In the above example the user is specifying whether they want to generate Normal or Uniform data. Here is an implementation:
library(shiny)

ui <- fluidPage(

  actionButton(inputId = "norm",label = "Normal"),
  actionButton(inputId = "unif",label = "Uniform"),
  plotOutput("hist")

)
server <- function(input, output){

  rv <- reactiveValues(x = rnorm(100))

  observeEvent(input$norm, {rv$x <- rnorm(100)})
  observeEvent(input$unif, {rv$x <- runif(100)})

  output$hist <- renderPlot({
    hist(rv$x)
  })

}
shinyApp(ui = ui, server = server)
reactiveValues are starting to move into a little more technical abstract ideas so, just to recap:
reactiveValuescreate a list of reactive values- you can manipulate these values (usually with
observeEvent) and an action button
Final food for thought:
code outside the server function will be run once per R session whereas code inside the server function will be run once per end user. Take home - if you don’t need to run the code more than once per user then put it outside the server function.
Thanks for reading!